By
By
Introduction to ETL with AWS Lambda
When it comes time to build an ETL pipeline, many options exist. You can use a tool like Astronomer or Prefect for Orchestration, but you will also need somewhere to run the compute. With this, you have a few options:
- Virtual Machine (VM) like AWS EC2
- Container services like AWS ECS or AWS Fargate
- Apache Spark like AWS EMR (Elastic Map Reduce)
- Serverless Computing like AWS Lambda
Each of these has its advantages. If you're looking for simplicity in setup, maintenance, and cost, you can run simple jobs with AWS Lambdas or Serverless Computing.
Notice I said simple. AWS Lambdas are not meant for compute-intensive or long-running jobs. They're suitable for executing small amounts of code that take minutes versus hours.
What are AWS Lambda and Serverless Computing?
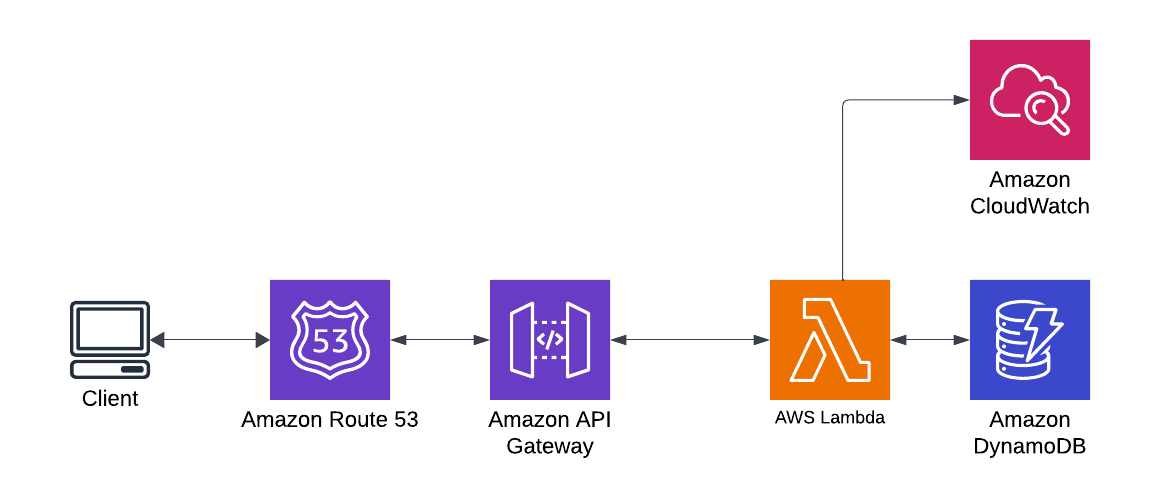
A Lambda function in AWS is a piece of code that is executed in response to an event. The event can be a request to an API endpoint, a file being uploaded to an S3 bucket, or a scheduled event. The code is executed, and the results are returned. Here is a great description of how it works from AWS:
Lambda runs your function only when needed and scales automatically, from a few daily requests to thousands per second. You pay only for the computing time you consume—there is no charge when your code is not running. For more information, see AWS Lambda Pricing.
A Lambda function is a wonderful way to think about ETL for smaller jobs that need to run frequently. Such as on a trigger, like an API call, or nightly on a schedule. It also allows you to orchestrate multiple Lambda functions to create a more complex ETL pipeline.
Let's dive into creating our first Lambda function.
Creating Your Lamba Function
From the AWS Console, navigate to the Lambda service. Press the Create Functionbutton to get started. You will be prompted to select a blueprint. For this example, we will select Author from scratch. Give your name an appropriate name and select Python 3.9as the runtime. Select the architecture you prefer or typically develop locally; this makes it easier to upload new libraries compatible with your Lambda function.
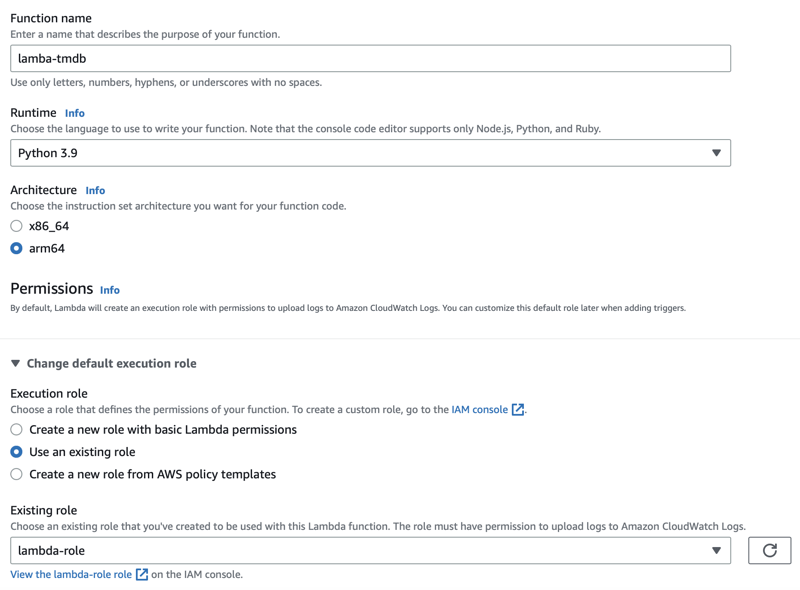
You can create a new role or choose an existing one. We'll cover that in the next section.
Lamba Role
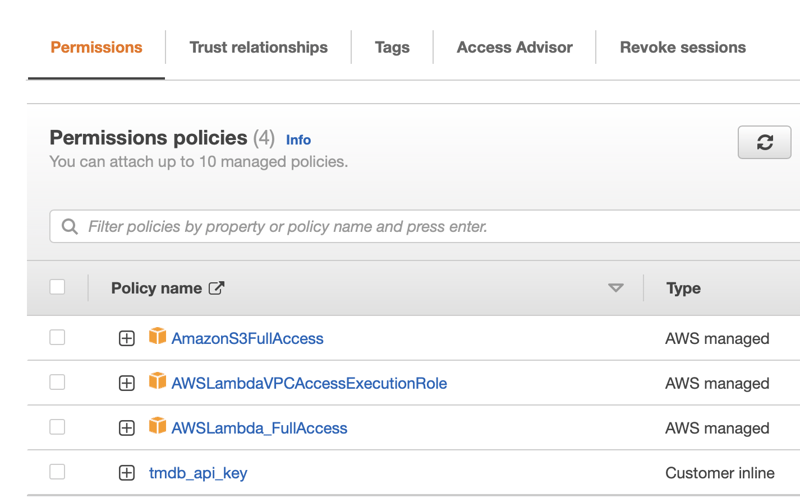
A critical part of creating a Lambda function is the role. The role allows the function to access other AWS services. For this example, we will need to give the function access to the Lambda and S3. I also gave access to VPC, but that's not necessary for this setup.
It's a good practice to create a new role to help you isolate only the permissions needed for this function. Or, if you will create multiple lambda functions for ETL use cases, consider a more generic naming like Lamba-ETL-Role.
Set Your Function's Timeout
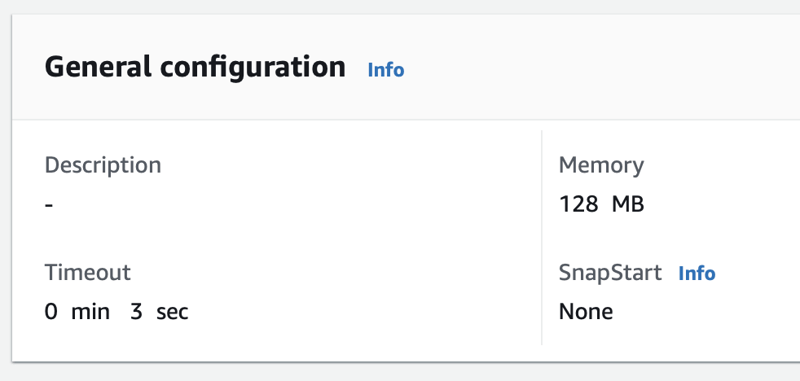
Next is configuring the function's timeout. Depending on how long the function will take to execute, you can increase it to 15 minutes. For this example, we will set it to 1 minute. You could see in your CloudWatch logs if the timeout was reached.
Click on the Configuration tab, and under General Configuration, set the timeout to 1 minute.
Using the Parameters and Secrets Extension
Next - this isn't 100% necessary, but it's a great practice when you want to ensure that you're handling sensitive data safely and not exposing it in your code. In the past, I've written about how to use Environment Variables to do this locally; however, in AWS, we'll use the Parameters and Secrets Extension.
The Parameters and Secrets Extension allows you to store sensitive data in the AWS Secrets Manager and access it in your Lambda function, a great way to store API keys, database credentials, etc. You can also use it to store non-sensitive data like configuration settings. You can read up more on this functionality here: Configure the Secrets Manager
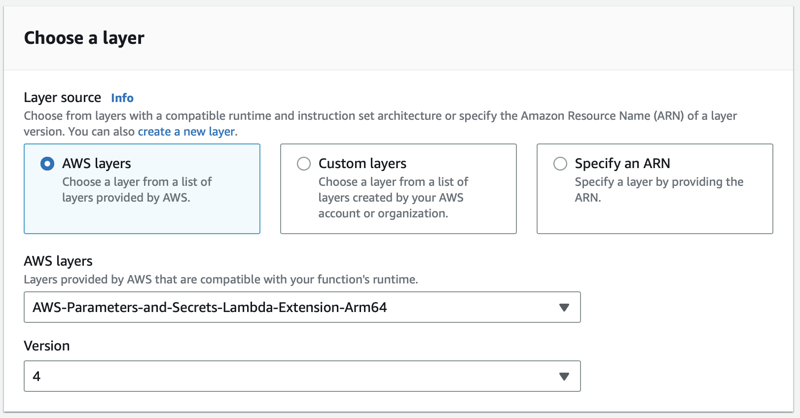
We'll start by adding a Layer to our Lambda function, allowing us to access the extension. From the Code tab, scroll to the bottom and click on Add a Layer. Select AWS Layersand then choose AWS-Parameters-and-Secrets-Lambda-Extension-Arm64 and the latest version of that layer.
Next, we need to add code to help us access the secrets. I've added this to a small function that will look up my API Key for The Movie Database (TMDB) and return it. You can see the full code below. TMDB is a great API for getting movie and TV show information, and it's free to use for non-commercial purposes.
As shown below, we'll create a headers variable with the JSON object. We'll then pass that into our API call to the secrets_extension_endpoint as shown. The response will be a JSON object with the secret string. We'll then parse that string and return the API key.
Where my code says << your secrets ARN >>, you'll need to replace that with the ARN of your secret. You can find that in the AWS Secrets Manager console.
Note: You will need to go back and modify your role to allow access to the secret you created. You can find instructions on how to do that in the AWS Documentation. Follow the example in the section "Example Read one secret (attach to an identity)".
import requests
import json

def get_tmdb_api_key():

 headers = {"X-Aws-Parameters-Secrets-Token": os.environ.get("AWS_SESSION_TOKEN")}

 secrets_extension_endpoint = (
 "http://localhost:"
 + "2773"
 + "/secretsmanager/get?secretId="
 + "<< your secrets arn >>"
 )

 r = requests.get(secrets_extension_endpoint, headers=headers)
 secret = json.loads(r.text)["SecretString"]
 secret = json.loads(secret)
 TMDB_API_KEY = secret["TMDB_API"]

 return TMDB_API_KEY
Add Support for Pandas
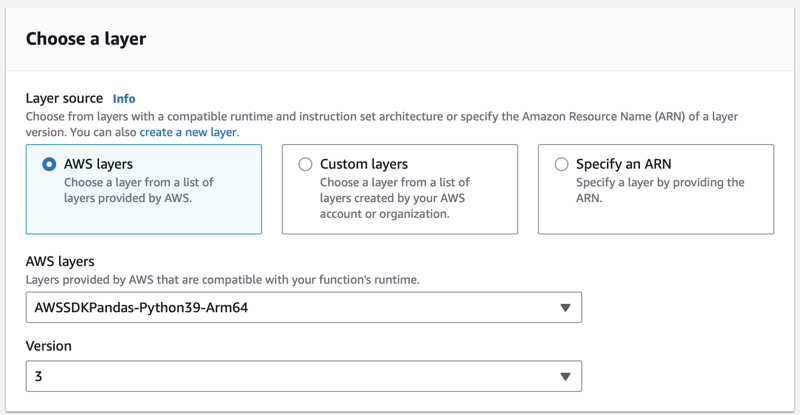
Next, our example and many other ETL use cases will require using Pandas. We'll need to add a layer to our Lambda function to support this. From the Code tab, scroll to the bottom and click on Add a Layer. Select Custom Layers and then choose AWSSDKPandas-Python39-Arm64 and the latest layer version.
After enabling this layer, you can import pandas in your code without having to upload the package to your lambda function.
Writing Files to an S3 Bucket
One very powerful workflow with modern Data Warehouses / Platforms is the ability to work directly with JSON data. We'll take advantage of this by outputting data to JSON filesin an S3 bucket.
We'll create a function that will take a DataFrame and write it to a JSON file in an S3 bucket. We'll use the boto3 library to do this. We'll create a JSON string using Pandas to_json method, encode it as utf-8, and then write it to the S3 bucket.
def write_to_s3(df, type, imdb_id):

 # Get JSON for the DataFrame
 output = json.loads(df.to_json(orient='records'))

 string = str(output)
 encoded_string = string.encode("utf-8")

 bucket_name = "lambda-tmdb"
 file_name = "out.json"
 s3_path = "output/" + type + "/" + imdb_id + "-" + type + "-" + file_name

 s3 = boto3.resource('s3')
 object = s3.Object(bucket_name, s3_path)
 object.put(Body=encoded_string)

 return "Success"
We call this function when we're ready to output our DataFrame to S3 with a few parameters such as the DataFrame itself, the type of data we're writing, and the IMDB ID of the movie or TV show. The type is here for convenience so we can write different data types with a single function while creating a unique file name for each movie lookup.
write_to_s3(df_crew, "crew", imdb_id)
Deploying Your Lambda Function
There are multiple ways to deploy your function, and the easiest is to use the AWS Console and upload a zip file. However, adding a little bit of automation here will simplify your life when making changes to your code.
The first step you'll need to do is set up the AWS CLI. You can find instructions on how to do that in the AWS Documentation Getting started with the AWS CLI. You'll want to create a new IAM user with the appropriate permissions to write to the Lambda service.
Next, I wrote a simple bash script that I can call from my local terminal, which does all the work needed. One very important step is to zip up your python libraries at the correct level and package them with the zip file. The script shows you the process of changing to the sites-packages directory and zipping the contents of the libraries you want to keep. Explicitly name the libraries you want here so you don't end up uploading unnecessary files.
Note: This also assumes that I've created a local virtual environment and have my function code local. I prefer to build my Lambdas this way so that I can version control everything in GitHub
# delete the old zip
rm tmdb-deployment-package.zip

# change the directory to the site-packages directory and zip the contents
cd venv/lib/python3.9/site-packages

# Explicitly add the tmdbsimple package folders needed for the lambda function
zip -r ../../../../tmdb-deployment-package.zip tmdbsimple tmdbsimple-2.9.1.dist-info

# change back to the root directory and add the needed python files
cd ../../../../
zip -g tmdb-deployment-package.zip lambda_function.py

# deploy to AWS Lambda
aws lambda update-function-code \
     --function-name lambda-tmdb \
     --zip-file fileb://tmdb-deployment-package.zip
After your function successfully deploys, you can head back to the console and see your code and the supplied packages. Notice the structure. The packages are in folders at the root level, allowing them to be imported like any other package as if you were developing locally.

Trigger the Lambda Function with an API Endpoint
As the final step to our function, we will trigger it with an API Endpoint using the AWS API Gateway and pass the function parameters as a query string, an ultra-powerful way to trigger specific events to fire for the exact data you want to process.
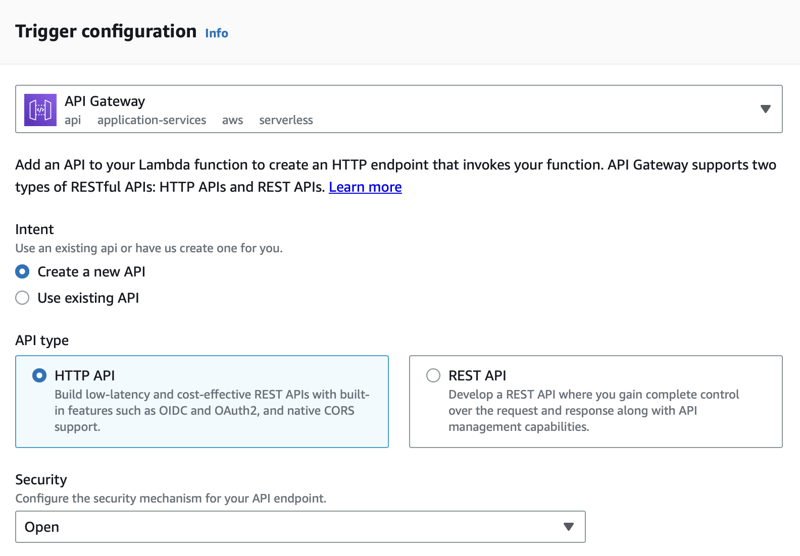
Navigate to the Configuration tab and click the Add Trigger button. Scroll to API Gateway and select the option for Create New API. Additionally, select the option for HTTP API and set the security to Open.
After the endpoint is created, you will have a URL with which you can trigger your Lambda. We'll pass a list of IDs as a query string parameter allowing us to pass multiple IDs to the function and process them all at once. Triggering your API with query string parameters is a very powerful way to process data in bulk.
We construct the URL as follows:
API Gateway URL + ?ids=tt0162346&ids=tt0326900
And now, in our function, we can access the list of query string parameters via the event object that is part of all Lambda functions. We'll access it through the multiValueQueryStringParameters key. And then, using the name of the query string parameter, we want to access, in this case, ids.
params = event["multiValueQueryStringParameters"]

id_list = params['ids']
Monitoring the Lambda Function with CloudWatch When Using an API Gateway
By default, you will get CloudWatch monitoring for your function. I've run into a few errors where I needed extended logging. You must add the following to your Log Format for the API Gateway Stage.
$context.integrationErrorMessage
Read the full instructions: Troubleshooting issues with HTTP API Lambda integrations.

Function Code
We will put this all together for the finale into our lambda_handler function. We retrieve the IDs from the Query string, then call our function, get_tmdb_api_key, to get the API key from the Secrets Store. Finally, we loop through our IDs and build a data frame, writing it to S3 with the function write_to_s3.
def lambda_handler(event, context):

    # Get the IDs from the Query String
    params = event["multiValueQueryStringParameters"]
    id_list = params['ids']

    # Get credentials from the Secrets Manager
    KEY = get_tmdb_api_key()

    # Loop through the IDs passed and do something with them
    for i in range(len(id_list)):

        imdb_id = id_list[i]

        # Get the movie details
        # CODE NOT SHOWN
        # Save the movie details as a dataframe

        # write it to S3
        write_to_s3(df_crew, "crew", imdb_id)

    # return a success message in the proper format for a Lambda function
    return {
        "statusCode": 200,
        "headers": {"Content-Type": "application/json"},
        "body": "Success",
    }
Orchestrating and Processing the Data in your Warehouse
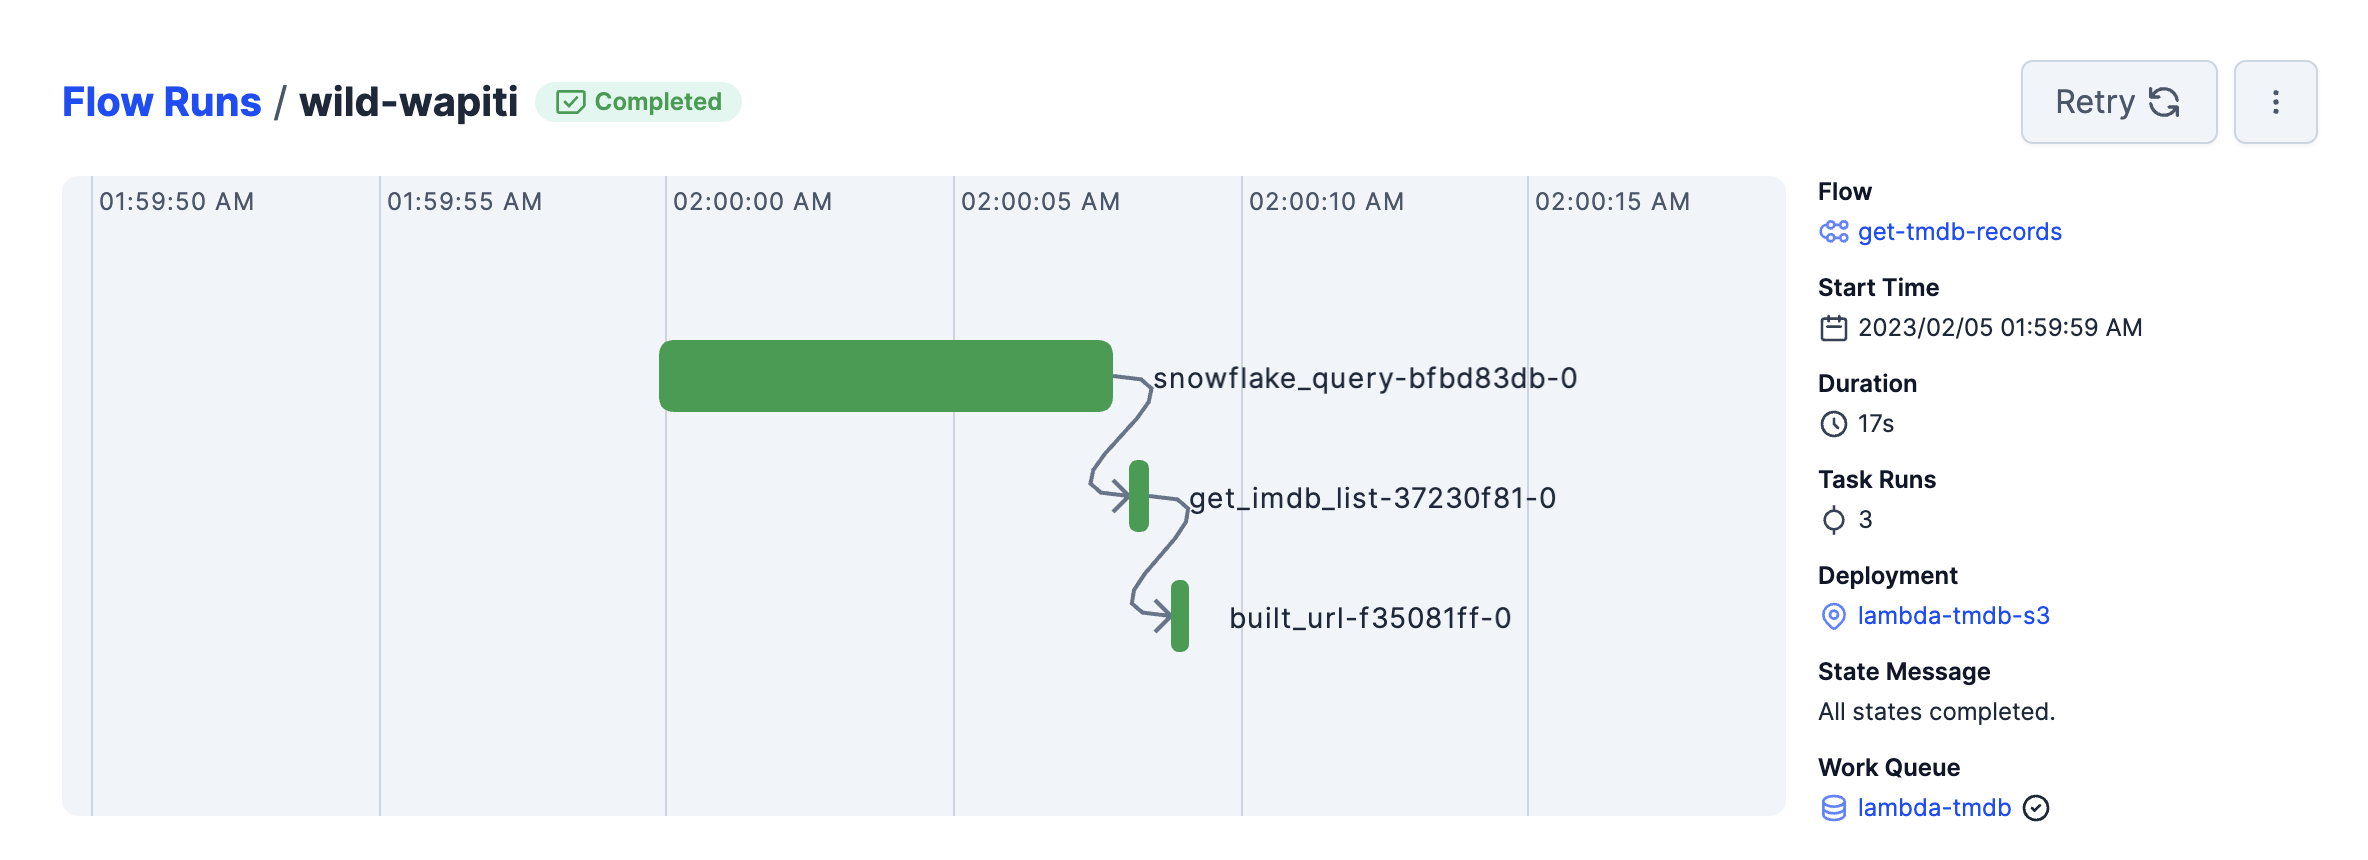
The final step is to trigger the API Endpoint in a workflow and then process the data in your warehouse. An example of how JSON works with snowflake can be found in my article Getting Started with Snowflake and the Rise of ELT Workflows in the Cloud.
For orchestration, check out Getting Started with Prefect: Powerful Orchestration for Your Data for the full details on how to orchestrate this particular workflow.
You can find the full code for this project on GitHub
Conclusion
When building ETL pipelines, you have many options to choose from when it comes to computing. For simple jobs, an AWS Lambda function can be a wonderful way to enrich your data or process quickly and efficiently. We started by showing you how to create a Lambda, including setting up the role to run it. Then we covered several recommendations, such as leveraging the Parameters and Secrets Extension to safely store information such as API keys. Then we look at how you can automate deployment using the AWS CLI. Finally, we triggered the function with an API Gateway and monitored it with CloudWatch. I hope this article shows how wonderful Lambdas can be and how you can add Lambda to your ETL toolbelt.