By
By
What is Prefect?
Prefect is an open-source orchestration tool for data engineering. It is a Python-based tool that allows you to define, schedule, and monitor your data pipelines. Prefect is a great tool for data engineers and data scientists who want to automate their data pipelines.
I found Prefect while looking for an alternative to Astronomer and Amazon Managed Workflows for Apache Airflow. While they're very popular tools for workflow orchestration, Prefect has some great advantages that make it worth looking into further!
For me, one of Prefect's biggest advantages is its pricing. They offer a free tier to get started that's suitable for personal learning or a small organization that's just getting started. Other tools in this space can cost thousands of dollars to get started.
For this article, we're going to automate the running of a data pipeline that pulls data from a Snowflake database and then calls a Lambda function to enrich the data. We'll use Prefect to schedule the data pipeline to run every night.
Head over to the Prefect home page, and create an account to get started; as mentioned - it's free!
Installing Prefect
Start by creating a new virtual environment and making sure PIP is up to date, which is always a best practice when you develop locally.
python3 -m venv venv

source venv/bin/activate

pip install --upgrade pip
Next, install Prefect using pip.
pip install -U prefect
Familiarize Yourself with the Prefect Tutorials
Prefect Tutorials. Start here and run through the Prefect Cloud Quickstart. Here you'll cover the basics of running everything locally during development. The purpose of Flowsand Tasks and Deployments of your code to the cloud. Those fundamentals are the same for this article and will only be covered in detail other than what's needed to get our project running.
Prefect Cloud
The Prefect Cloud provides a hosted system that coordinates all of your orchestrations and records their history. It doesn't do any computing; we'll set that up later in this article.
When you first log in, you'll see a screen that looks like this (minus the history):
Tasks and Flows
Next, we'll look at the code needed to run our orchestration. Prefect is built around the concept of tasks and flows. A task is a unit of work that can be run independently, and a flow is a collection of tasks that are run in a specific order.
We'll need to import a few things from Prefect to get started. First, we need flow and task from Prefect. We'll also need get_run_logger to log information to the Prefect UI. I'm also importing their purpose-built Snowflake Connector and Snowflake Querytasks. These simplify the process of connecting to Snowflake and running queries.
I am also loading that connector set up in the Prefect Cloud UI. The connector is configured already with your credentials and the database and warehouse you want to use. You can find the connector in the Prefect Cloud UI under Blocks.
Note: To be able to use the Snowflake Connector and Query tasks, you'll need to install the prefect-snowflake package. You can do that with the following command: pip install prefect-snowflake.
import requests
from prefect import flow, task
from prefect import flow, get_run_logger
from prefect_snowflake.database import SnowflakeConnector
from prefect_snowflake.database import snowflake_query

snowflake_block = SnowflakeConnector.load("my_snowflake_connector")
You can think of tasks as small units of work, no different than you would write a function in Python. The only difference is that Prefect tasks are decorated with the @task decorator. This decorator tells Prefect that this task can be run independently, and you can also pass in parameters to the task.
The first task we'll create is get_imdb_list. This task will take the result of the Snowflake query and extract the IMDB IDs from the result. We'll need these IDs to call the Lambda function. The result of this task will be a list of IMDB IDs.
@task
def get_imdb_list(result):

    id_list = []

    for i in range(len(result)):
        id_list.append(result[i][2])

    return id_list
The next task we'll create is built_url. This task will take the IMDB ID list and build the URL we'll use to call the Lambda function. The URL will look something like this:
https://<< API Gateway URL >>/lamba-tmdb?ids=tt0000001&ids=tt0000002&ids=tt0000003
Notice the standard convention of using the same Query String Parameter for each unique value. Our Lambda function will parse that and loop through the IDs.
@task
def built_url(id_list):

    url = "https://<< API Gateway URL >>/lamba-tmdb?"

    for i in range(len(id_list)):
        url += "ids="
        url += id_list[i]
        if i == len(id_list)-1:
            return url
        else:
            url += "&"

    return url
Finally, our Flow is the main block of code that coordinates our orchestration. The code starts by building a query for our Flow. This example returns three random results from our database for test purposes. We would call a queue of unprocessed records in a production environment.
Next, we call our two tasks from above. First, to get the IDs as a list from the query and second, to build the URL. We'll log the results to the Prefect UI.
Finally, we'll call the Lambda function with the API Gateway URL. We'll use the requestspackage to make the call. We'll also log the response to the Prefect UI.
Note that next to the Flow decorator, we have retries = 3 telling Prefect to retry the Flow three times if it fails. Prefect simplifies retry logic for you.
@flow(retries = 3)
def get_tmdb_records():

    logger = get_run_logger()

    # The max should never exceed 70 records
    # based on URL legth limits
    query = """
    SELECT ORG_ID, CREATIVEWORKID, IMDB_VALUE
    FROM EIDR.PUBLIC.ORGS_IMDB_FILTERED
    ORDER BY RANDOM()
    LIMIT 3;
    """

    result = snowflake_query(
        query,
        snowflake_block,
        params={"id_param": 1}
    )

    # Call the first tast to build our ID list from the query results
    id_list = get_imdb_list(result)
    logger.info(id_list)

    # Call the second task to build the URL
    url = built_url(id_list)
    logger.info(url)

    # Call the Lambda function with our URL
    response = requests.get(url)

    # Basic error handling.  The lambda returns 200 if successful
    # and Typically a 500 if there is an error
    if response.status_code == 200:
        return logger.info(response.status_code)
    else:
        raise Exception(response.status_code)

if __name__ == "__main__":
    get_tmdb_records()
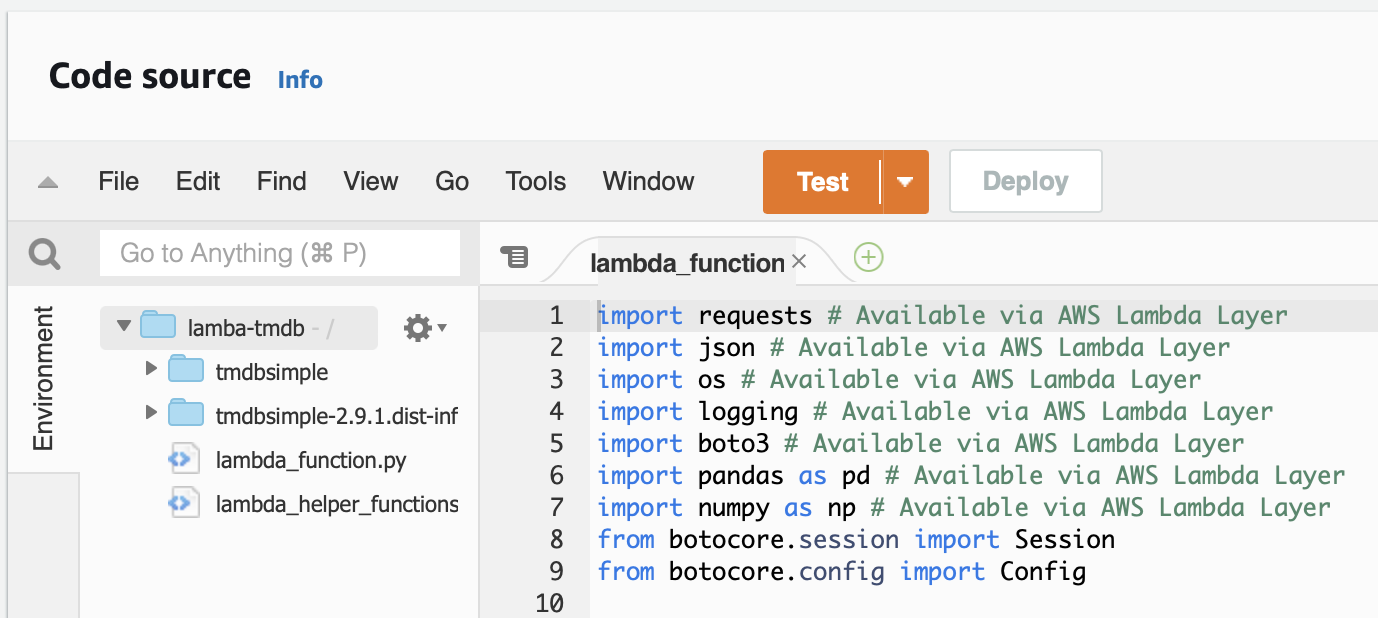
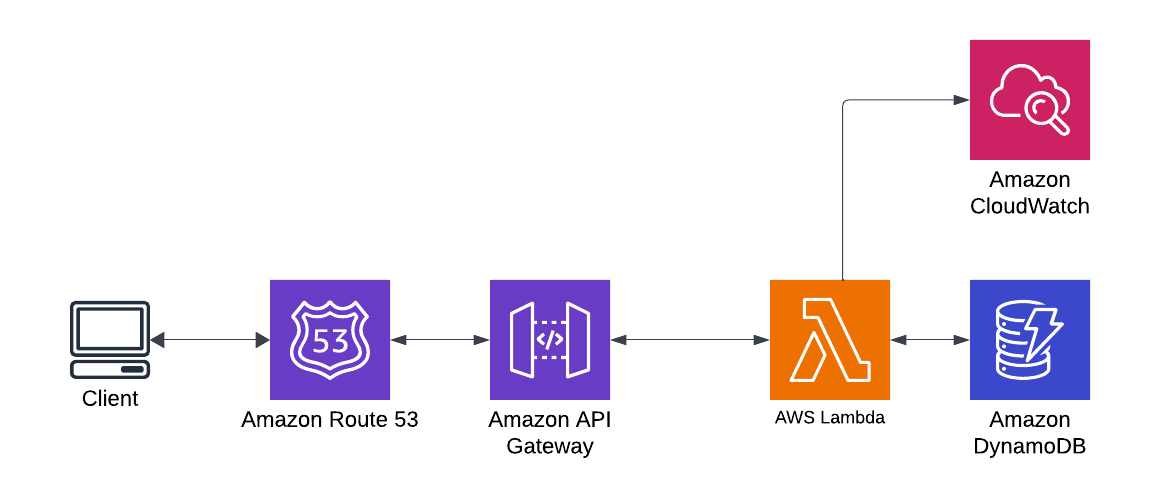
What is our Lambda Function?
I previously posted about creating this Lambda deployment. Check out the article, How to Setup a Simple ETL Pipeline with AWS Lambda for Data Science.
Setting Up Cloud Storage
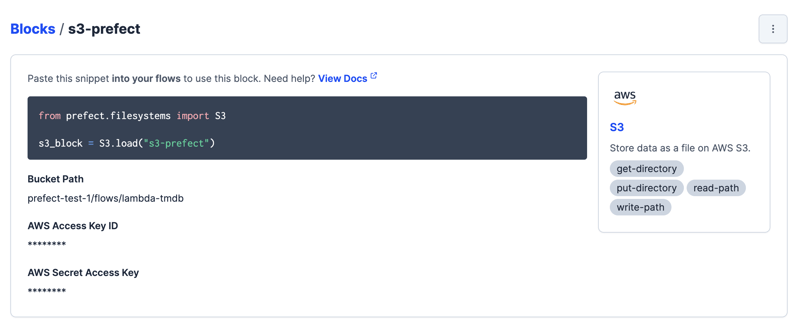
Prefect uses cloud storage to store the code from your deployment, making it possible to easily run your Flows on remote Agents without manually copying the code there. To complete our deployment, we need to create a cloud storage block, and I'm using AWS S3 for my storage.
Navigate to Blocks in the Prefect UI, find the AWS S3 block, and click Create. You'll need to provide the following information:
- Block Name: Choose any name you'd like. Make it descriptive enough, so you know what its intended use is.
- Bucket Path: The syntax is 'bucket_name/path/to/folder'. You do not need to include the 's3://' prefix.
- AWS Access Key ID and AWS Secret Access Key: See below for instructions on obtaining these values.
You can obtain a key and secret by creating a new user in AWS IAM. You'll need to give the user AmazonS3FullAccess permissions. After creating the user, navigate to the Security Credentials tab and create new access keys. You can select Third Party Service as the type of access key. Copy the values and store them securely, such as a password manager.
Deployments
Ensure you're logged into the Prefect Cloud instead of a local Orion server. You probably are if you followed along with the tutorials earlier; however, if you're not, use the following command:
prefect cloud login -k <<Your API Key>>
Next, we want to build our deployment. The output is a YAML file that will be used to deploy our Flow to the Prefect Cloud. We'll use the prefect deployment buildcommand to create the deployment. The command takes the following arguments:
python_file:flow_name: The name of your Python file that contains your Flow, followed by the name of the main flow.-n: The name of the Flow. This will be the name of the Flow in the Prefect UI.-sb: The name of the storage block we created earlier. This is the block's name in the Prefect UI prefect by the block type (s3 in this case).-q: The name of the work queue. This is the name of the work queue in the Prefect UI.-o: The name of the output file. This is the name of the YAML file that will be created.
prefect deployment build lambda-tmdb.py:get_tmdb_records \
     -n lambda-tmdb-s3 \
     -sb s3/s3-prefect \
     -q lambda-tmdb \
     -o lambda-tmdb-deployment.yaml
After we create the deployment, we need to apply it to the Prefect Cloud, creating a new Flow in the Prefect UI.
prefect deployment apply lambda-tmdb-deployment.yaml
That's it! If you navigate back to the Prefect UI, you should see a flow and a work queue.
Running Your Agent in the Cloud
The next thing needed is to run the Prefect Agent in the Cloud. You don't want a dependency on your local machine, or you won't have a reliable orchestration. I chose to run mine in EC2 using a t2.micro instance running AWS Linux. The beauty of this is that since most of the work is done by Lambda, we can run a very small server that will cost less than $10.00 a month to run. Alternatively, you could run the Agent in a Dockercontainer.
Follow the instructions in this Discord post on how to get the Agent set up as a systemd service.
How to run a Prefect 2 agent as a systemd service on Linux
Here are some tips I discovered along the way:
- Install PIP with the following command
curl -O https://bootstrap.pypa.io/get-pip.pyand thenpython3 get-pip.py --user. - Prefect requires python3-devel to be installed. You can install it with
yum install python3-devel. - Use Pip to install your dependencies like
s3fs,prefect, andprefect-snowflake. - You will need to set up an Alias for Python3. I added the following line to my
.bashrcfilealias python=python3. - You need to specify the correct path for
ExecStartwhen configuring the service per the instructions. You can find the path by runningwhich prefectin the terminal. Mine was/home/prefect/.local/bin/prefectinstead of the/usr/local/bin/prefectspecified in the instructions.
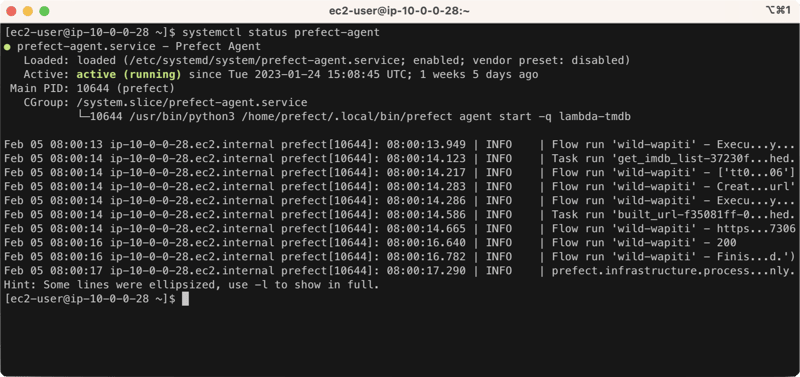
Now you can check the status of your service with the following command:
systemctl status prefect-agent
If all is running properly, you should see something like the following. Note that I have a recently executed run, so you can also see the status of that run in the image.
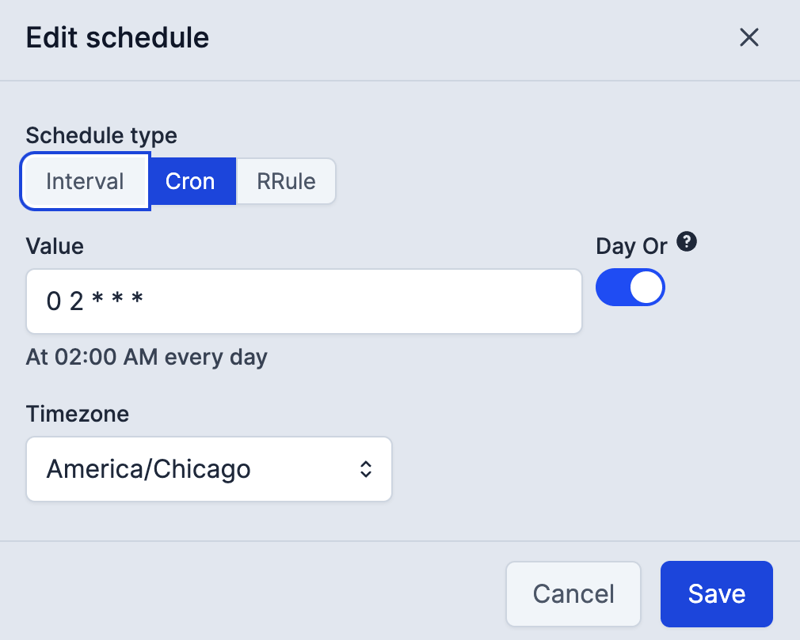
Deployment Scheduling
As part of completing the process, I will set up my job to run nightly. My data sync using Fivetran happens at midnight and usually takes a few minutes. I've configured this to run a couple of hours after that, at 2:00 am daily. I could coordinate this to run closer to the Fivetran sync, but I will keep it simple.
You can utilize Cron expressions for scheduling your jobs precisely. For a great tool to help you write and validate your Cron expressions, check out Crontab Guru.
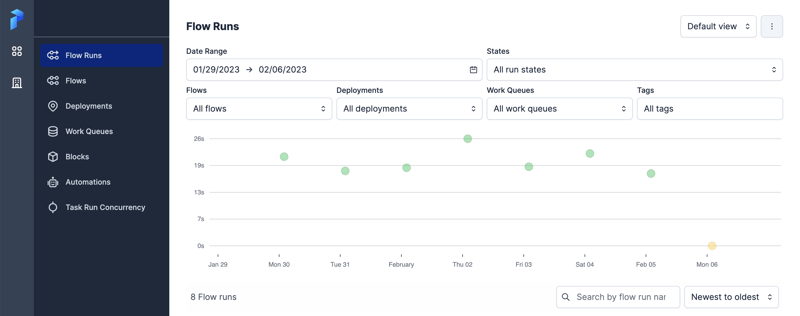
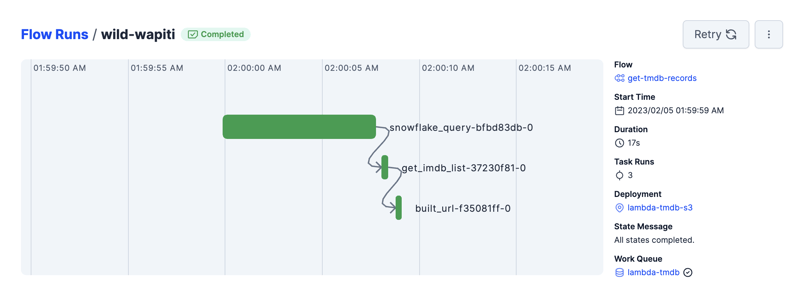
Flow Monitoring
Finally, you will want to monitor your jobs. You can have it send emails on errors or post slack messages to your team, and I'll leave that up to you to configure. For now, I will monitor the flow runs in the Prefect UI.
What's Next?
Most of the operations here prove the workflows. Next is to complete the proper logic of pulling only the IDs that need updating on a nightly basis.
After that, we'll need to execute the necessary SQL commands to pull our data from S3 into a Snowflake stage and process it from there. You can read more about how that works in this article, Getting Started with Snowflake and the Rise of ELT Workflows in the Cloud.
Conclusion
Phew! That was a lot! In this article, we started by creating a Prefect Cloud account. We installed the software locally and covered the authoring of our orchestration. Next, we created a storage block and a work queue. We then built and applied our deployment. Finally, we set up our Agent in the Cloud and scheduled our job to run nightly. We also monitored our job in the Prefect UI. Perfect offers a great way to get up and run for personal learning or small organizations for free and scales up to help larger organizations with their workflow needs.